OwnerRez can automatically generate codes for your many different types of door locks, including numeric sequence locks and WiFi locks. Each time a booking is created, OwnerRez will automatically set the door lock code without you lifting a finger! If the booking moves properties or changes dates, the code is updated or a new code is generated (depending on the capabilities of the lock) so that the guest always has the correct code.
It is best practice to complete a Batch Update whenever you change or edit your door lock integration.
Users are not required to use the same lock integration system for all their properties but can only integrate one lock system per property.
Here is the general information on all door lock integrations:
- Setting Up the Integration
- Door Lock Integration Grid
- Code Generation and the Booking Side
- Showing/Sending Codes To Guests
- Sync Guest Contact Information
- Batch Updates Codes on Multiple Bookings
- Canceled Bookings
- Common Doors
- Lock Connection Problems
- Deactivate Door Lock Integration
- Change Door Lock Integrations
And specifics on each supported type:
- Schlage
- igloohome
- Hubitat
- Brivo
- eRentalLock
- i-checkin
- GuestsKey
- Jervis Systems
- Kaba/Oracode
- Lynx
- Manual
- PointCentral
- RemoteLock
- ResortLock
- Unsupported Manually Programmable Door Locks
Setting Up the Integration
To get started, go to Settings > Door Locks then click the button to connect to your type of integration.
For some lock types, the connection process may take you to the lock provider to log in and authorize OwnerRez to connect to your account. For others you'll need to enter a username/password.
Configuration
Once you're in the connection process, the available configuration options will display.
Here's a rundown...
Check-In/Check-Out and arrival/departure Grace Period
By default, codes are limited to the specific check-in/check-out times of the booking with a 1 hour grace period. You can alter the grace period, turn it off, or make the code work all day. We recommend at least some grace period, and we recommend caution before turning it off.
If there's no grace period, the system will create codes that limit the guest to the exact times of their booking based on the check-in/out times on their booking or property. While this may seem good at first, keep in mind that it means the guest will not be able to get in if the time on the lock is slightly different then expected. For instance, you could have Daylight Savings Time not configured on one side or the other. Another example is where the guest checks out a few minutes late and, after carrying items out to their car, can no longer get back inside the property.
⚡ WARNING:
The grace period is calculated from the check-in/check-out times - which means that check-in/check-out times must be set. OwnerRez has built-in default check-in/check-out times if you haven't set them, but these are not used for lock time calculations.
Make sure you have explicitly set the default check-in/check-out times for each Property under your Property Rules. If "standard" is selected, the lock code will be programmed to allow access all day - from midnight, to midnight - which you probably do not want.

The Generate How option defines how the code will be generated. All locks (except for manual) support letting the lock provider generate the code. If the provider supports setting codes, you'll be able to choose an option to generate based on the guests's phone number or a random number, and choose how many digits to use.
If the booking does not have a phone number on file when it is time for the code to be generated, no code will be generated. As soon as a phone number is provided, a code will immediately be generated with no additional manual actions required; however, any email templates that should have contained the code but have already been sent without it, would need to be manually resent.
The Generate When option controls when the code will be generated -- at booking, a few days before arrival, or completely manually when you use Set Code or Generate Code on the booking. Code generation will not occur until pending bookings are confirmed.
If you have your Code Generation > Generate When set to "A number of days before arrival," OwnerRez suggests giving ample time (2+ days) between generating door codes and sending them to your guests. This allows for any potential delays in processing door codes, which could lead to sending templates with blank door code fields to guests.
The Generate For option lets you generate codes for bookings only, or both bookings and blocked-off time. Blocks created by mutual blocking will never have codes generated regardless of this setting.
The Segment Length option lets you take a long code and split it with hyphens for an easier to read display for guests. For example If you have a 10 digit code, you could set a segment length of 3 and get 123-456-7890.
The Contact Info option will only show for lock types that can accept contact info, and lets you send the contact email to the lock provider when generating the code.
Property Mapping
Once the record is created, you will see a page showing the integration and a Property Mapping section. This is where you'll match your locks to the properties to which they apply. You can match one property to multiple locks, as well as one lock to multiple properties.
Click the Change button on the Property Mapping.
Select which lock to use for which property.
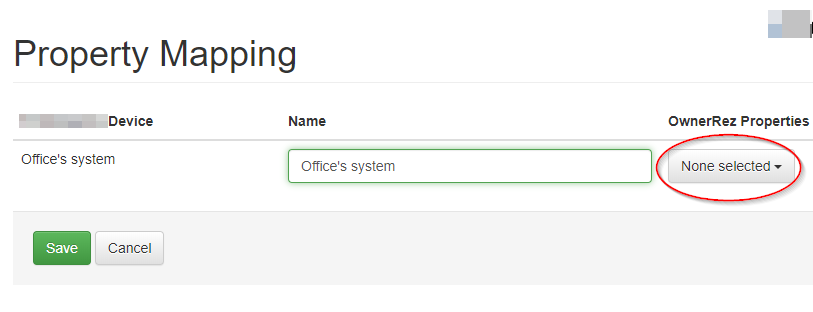
It is not necessary to select a lock for every property. You may have properties that do not have a lock installed - leave those blank. If blank, OwnerRez will consider that property to not have a lock, and no code generation will occur for bookings at those properties. You may also have locks of different types at different properties -- in that case, you can set up lock integrations of different types and map them to the correct properties.
Door Lock Integration Grid
Once your Door Lock Integration is live, the Door Lock Integration Grid will display all door lock integrations, including the Properties column for clarification.
Code Generation and the Booking Side
Now that you have lock integration configured, let's look at your bookings and the code generation side.
Open any booking at a property that has lock integration configured. Once opened, you'll see a new Door Code value showing on the Booking Overview > General Info > Door Code section.
Since you just configured the lock integration, the booking won't yet have a code generated. That's because the booking was created before lock integration was established. We do not automatically generate codes for all bookings right when lock integration is configured - that would take a long time and blanket the system with codes for bookings that may not need them. But don't worry, you can still update bookings in bulk! We'll get to that below.
For now, go ahead and click that "Generate" link next to the red "Not Set" label. The generated link will spin for a second and then a code should drop into place. That's the door code for this booking, provided by the lock system.
Moving forward, when new bookings are created, the Door Code will be automatically generated. You don't have to click the generate link unless you want to get a new code. If the booking is moved to a different property or changes dates, a new code will be automatically generated for those situations as well. If a code fails to generate, you'll get an email from our system so that you know.
Resync
While algorithmic lock codes (e.g., eRentalLock) can't be regenerated, they can be resynced if there's an existing code by simply clicking the Resync link.
Then a pop-up modal will appear explaining the door lock codes will be resynced but the door code won't change.
Showing/Sending Codes To Guests
The last part of this is sending the door code to the guest. After all, what good is a door code if the guest doesn't see it?
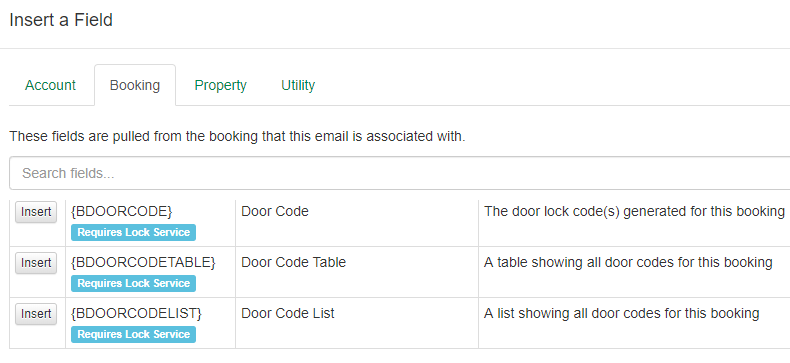
The {BDOORCODE} field code can be added to message templates that will insert the specific booking's door code into emails. If there are multiple door codes, you can use the {BDOORCODETABLE} or {BDOORCODELIST} instead.
Create Guest Arrival templates that include the door lock field code and send them to guests using a trigger a couple of days before their arrival.
Sync Guest Contact Information
If available as part of the Door Lock integration, users can send guest contact email and phone numbers to the integrated Door Lock system by navigating to Settings > Workflow & Devices > their specific Door Lock integration > Change > Options > Contact Info and checking the Send contact email and phone to Door Lock integration checkbox and click Save.
Batch Update Codes on Multiple Bookings
Now back to your current bookings! We don't expect you to click through all your current bookings and generate a code for each one manually. We've created a special page that lets you batch update bookings.
It is best practice to complete a Batch Update whenever you change or edit your door lock integration.
Head back to the Door Locks integration page you set up (under Settings). At the top, click on the Batch Update Bookings button.
You'll see a screen where you can find multiple bookings and generate codes for all of them at once.
Read the options, select the bookings you want to update and press the button! You can generate codes for only specific bookings or blocks, generate codes only if there's not a code yet, or generate codes for all bookings.
Voila! Your hundreds (thousands?) of future bookings now have a door code! You should only need to use this Batch Update screen one time when setting up your lock integration, or if you changed or upgraded which door locks you have at the property.
Please note that this function will only work for OwnerRez built door lock API connections, not third party/vendor built connections. Currently the only door lock service that would not fall into that category is Jervis Systems. Third party/vendor built connection will typically have a function like this on their side.
Canceled Bookings
When a booking is canceled, the door lock access code associated with that booking will automatically be canceled if the lock is a connected lock. Non-connected/algorithmic-based locks do not support deleting codes.
Common Doors
Common doors may be exterior doors used by multiple properties, but each common door device still needs to have specific property mapping to both:
- The multiple individual OwnerRez properties
- Each individual property's own private door lock
Lock Connection Problems
Occasionally, integrated locks become unauthorized, resulting in door lock errors. When that occurs, users will see in-app notifications when their lock integration needs to be reauthorized.
You can also configure a Lock Problem Notification to notify yourself of any lock connection problems.
Deactivate Door Lock Integration
Users can deactivate their integrated door lock by navigating to Settings > Workflow & Devices > Door Locks > the specific Door Lock integration they want to deactivate > Options, unchecking the Active Status checkbox and clicking Save.
Change Door Lock Integrations
OwnerRez recommends following the process below for changing from one door lock integration to another in the following steps.
- Ensure that your new lock integration is working correctly, including completing the Property Mapping process.
- Disable your old lock integration.
- Run a Batch Update for all affected bookings. In the Action section, select Resynchronize all bookings. Click Execute Batch.
4. Test and verify that the new door codes are correct.