
SafeGuest is on a mission to give every host peace of mind, offering modern protection that fits the fast-paced world of short-term rentals.
Steps for integration
1. Create your SafeGuest Account
- Go to https://app.safeguest.ai
- Fill in the required information on the sign-up form
- Accept terms: “I accept SafeGuest’s terms of use and privacy policy”
- Click the Create an account button
2. Verify Your Email Address
- Check your inbox: Locate the verification email sent by SafeGuest.
- Open the email and click the Confirm Email button (or link) to complete registration.
- You will be redirected to a success page confirming your email has been verified.
- Click the Continue button to proceed.
3. Select OwnerRez During Onboarding
- Once you click continue from the email success page, you will be taken to the SafeGuest onboarding screen.
- Select OwnerRez from the list of available integrations.
- Proceed: Click the Continue button to move forward with the setup.
4. Log In and Authorize OwnerRez
- Log in to OwnerRez: You'll be prompted to sign in unless you're already logged in, in which case this step will be skipped automatically.
- Review permissions: Approve the connection between SafeGuest and your OwnerRez account.
- Click the Authorize SafeGuest button to authorize the integration.
5. Complete the setup banner steps
In SafeGuest, navigate to Settings > Profile Details, and update.
6. Navigate to: High Risk Bookings Page
Add the email address(es) that will receive notifications for high-risk bookings.
7. Configure Currency and Deposit Settings
- Navigate to the Currency tab within your SafeGuest account settings.
- Select your account currency from the available options.
- Set a default deposit amount. The waiver amount is calculated automatically.
- Save your settings.
8. White-Label: Add your Company Logo and Brand Colors
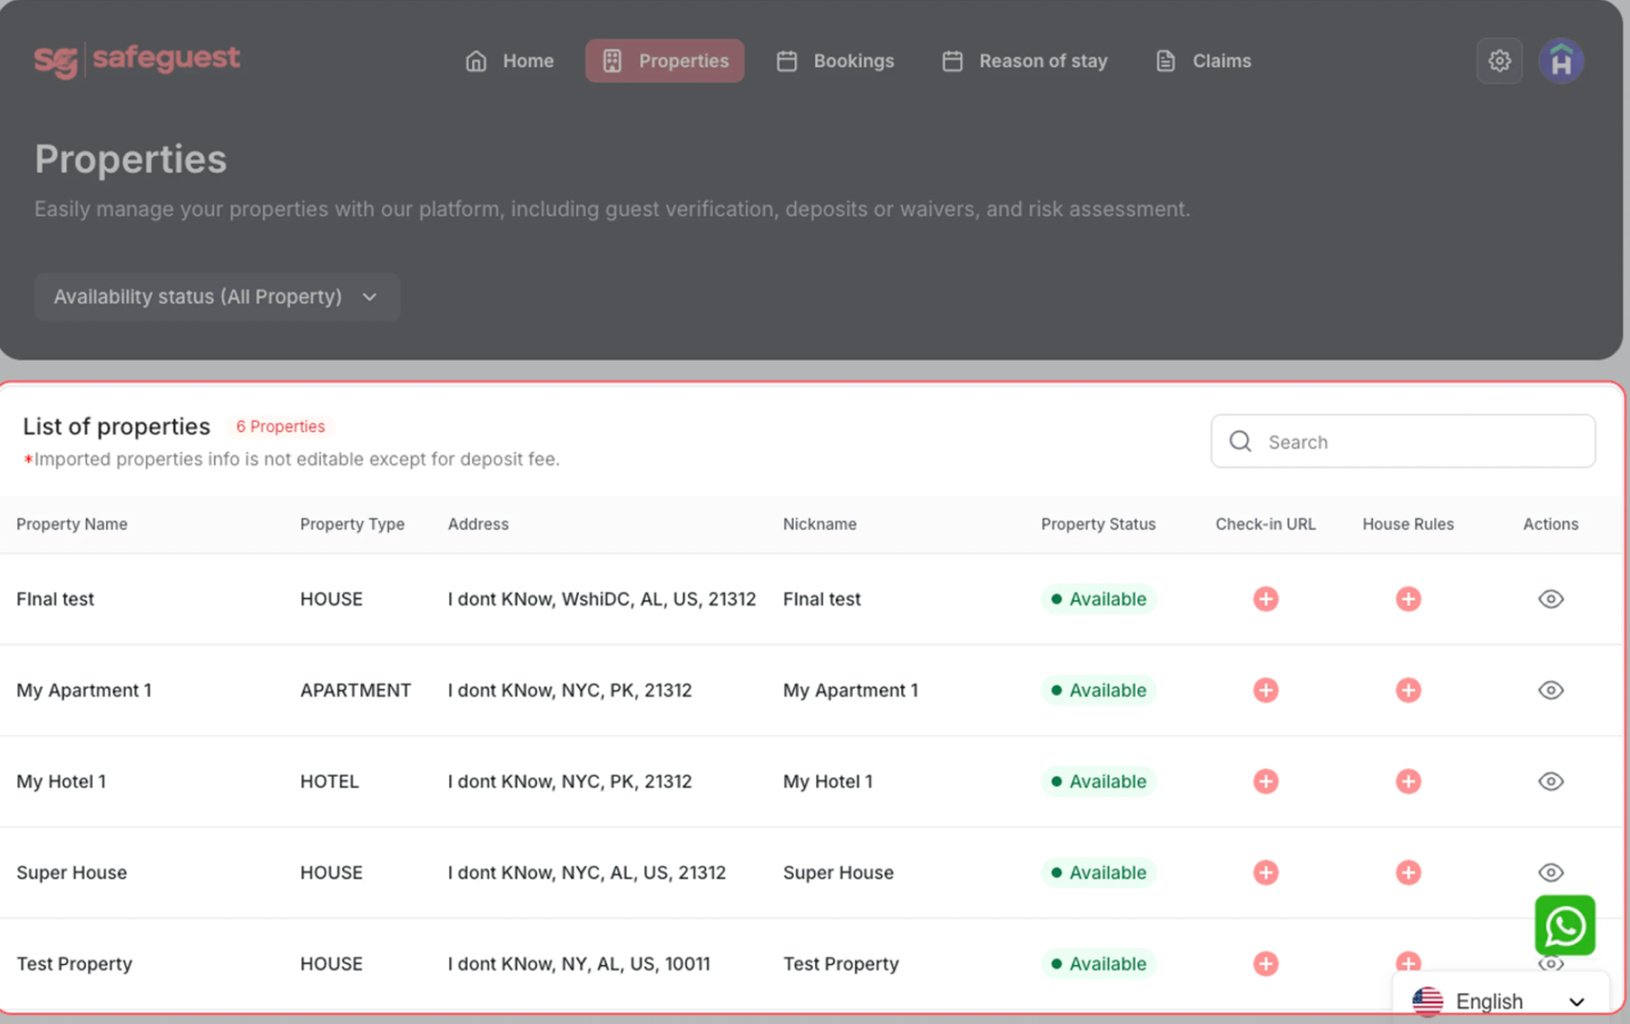
9. Verify Your Properties in SafeGuest
- Go back to the browser tab with your SafeGuest dashboard.
- Click on the Properties page from the main menu.
- Check that the listings you just enabled in OwnerRez are now visible.
- Wait if needed: synchronization usually takes less than 1 minute to complete.
10. Verify Your Bookings
- Open the Bookings page: Click on Bookings in the navigation menu
- Review upcoming bookings
- View booking details: Click the Eye icon next to a booking to open and review details
11. Verify & Review
- Wait for the guest to complete verification: Once the guest has successfully completed the SafeGuest verification process, additional information will become available within the booking details
- Review the guest’s Arrival Briefing to access relevant booking and stay information
- Review the guest’s Risk Score to better assess potential booking risks
- Read the AI-generated Summary for an overview of the guest verification results
- View booking details: Click the Eye icon next to a booking to open and review details
OwnerRez Tasks
Email Template
In OwnerRez, create an email template (Settings > Templates > Email tab > click the Create Email Template button > select the "Booking" option). Copy and paste the following values into your new email template.
Name:
Verify with SafeGuest
From Name:
{MYCOFULL}
From Address:
{MYEMAIL}
To Name:
{CFULL}
To Address:
{CEMAIL}
Subject:
Verify your identity with SafeGuest
Body:
Hi {CFIRST},

{MYFIRST} verifies every guest before sharing check-in details — their standard policy for all bookings, on every platform.

Your stay at {PNAME}, {BARR} – {BDEP}: under 2 minutes with your government photo ID (passport, residence card, driver's license, or any govt photo ID card).

Complete it here:
 {BXRESERVATIONVERIFICATIONLINK}

🎥 The ID photo + selfie step trips most people up — 30-sec demo:
 https://www.youtube.com/watch?v=DzsknGhpZkU

Booking reference: {BID} · booked via {BSOURCE}. Your host is happy to confirm this step — message them anytime.

Your ID is encrypted and used only to verify your identity.
Save and Preview.
Trigger
Create a trigger to send your email message by navigating to Settings > Messaging > Triggers > and clicking + Create Trigger to pull up the new trigger screen.
Type:
Scheduled
Event:
Minutes After > Booking is created > 10 minutes after
Conditions:
Email Address on File is One Of > Has Real Email Address
Action:
Verify with SafeGuest Email Template
View Custom Verification Fields
- Select a booking: Open the booking you want to review
- Open Custom Fields: Click the Custom Fields tab.
- Review verification data: View the risk level, verification link, and related details.
Congrats! Your Setup is now complete.
What Data is Transmitted
Property Information Synced from OwnerRez:
- Property ID
- Name
- Description
- Nightly Minimum Price
- Property Timezone/ User Timezone
- Property Type
- Full Address (street 1, street 2, city, state, postal code, country)
- Headline
- Maximum Occupancy
- WiFi Network & WiFi Password
- House Rule/ Cancellation Policy
- Check-in Instructions
- Property Images
- Currency Code
Booking Information Synced from OwnerRez:
- Booking ID
- Reservation Number
- Arrival Date and Check-In Time
- Departure Date and Check Out Time
- Currency Code
- Total Amount
- Guest First Name and Last Name
- Number of Adults, Children, Infants, and Pets
- Status
- Listing Site
- Notes
Custom Fields Information Synced from OwnerRez:
- Custom Field ID
- Name
- Type
- Description
Custom Fields Information Synced to OwnerRez:
- Verification Link
- Risk Level Safe
- Risk Level